Showing posts with label Linux. Show all posts

[Guide] How to install VMware Tools on Ubutntu 12.04 LTS in VMware Workstation 8


In previous post we learn How to Install Ubuntu 12.04 LTS in VMware Workstation 8. It is necessay to install VMware tools on Virtual machine as it contains all necessary required updates for all your mouse,display & network drivers. Now I will show you how to install VMware tools on Ubutntu 12.04 LTS in VMware Workstation 8.

VMware tools installtion is easy & stright forward so lets get started.

Right Click on Ubuntu Virtual machine & click on "Install VMware Tools" as shown below,


It will mount a CDROM under Ubuntu VM. Right on the mounted VMware Tools folder & click on "Extract to" to extract vmware tools files. In my case I am extracting files on my Desktop folder.


Now you can see the vmware tools  files has been extracted on my desktop


Now open Ubuntu terminal to execute the VMware Setup file (perl executable).  To open Ubuntu Terminal Hold down the Super Key (that is windows key) and then use ALT+B and ALT+L.


Go to vmware tools folder & execute below command.


#sudo ./vmware-install.pl


You can see the VMware tools has been installed. You can verify the version of it by running below command in Ubuntu Terminal.


#vmware-toolbox


[Guide] How to Install Ubuntu 12.04 LTS in VMware Workstation 8


Today I have got time to install Ubuntu 12.04 LTS on VMware Workstation 8. ANd it was
success, I have seen so many forums that users was not able to run Ubuntu 10.04 in VMware
Workstation but I was able to do so..

What is new in Ubuntu 10.04 LTS

Ubuntu 10.04 comes with thousand of free softwares & it does everything user needs to do in
daily computer use. It even work with your Cameras,Printer & MP3 palyers.

1. The Head-Up Display (HUD)
The new HUD gives you a fast alternative to the traditional, menu-based way of telling your
computer what to do. Instead of clicking on menu items to give it instructions, you just tap the
alt key to bring up the HUD and start typing what you want to do. You’ll then get a list of
functions, without ever needing to know in which menu they live.

2. The Video Lens
The new Video Lens makes it easier than ever to find the videos you want to watch. Just click
on the icon on the Dash and enter your text to search. Whether it’s stored on your computer, on
YouTube or anywhere else, you’ll soon see a list of matching content.

3. Ubuntu Software Centre
The Ubuntu Software Centre gives you instant access to thousands of apps. You can see the
top-rated apps, compare apps by rating and user reviews, keep track of what you've installed,
and sync your apps between all your Ubuntu computers.

So lets get started, New VM creation under VMware workstation 8 is straight forward so I am not adding all screen shots. If you want you can refer my other posts for the same.

It is necessary to install VMware tools on Virtual machine. I have covered in steps in my How to install VMware Tools on Ubutntu 12.04 LTS in VMware Workstation 8 article.

First create Custom Virtual machine and select guest VM operating system as Linux and version as Ubuntu as shown below


This is my Ubuntu 10.04 Virtual machine summary. I am using 2GB of memory with single processor. If you want you can use more memory & CPU as per requirement.  Also I am using 20GB of Hard Disk.


In next step I have mounted my Ubuntu ISO file & stared my Virtual machine. Here is the booting screen of Ubuntu,


How to Intsall Fedora Core 17 "Beefy Miracle" on VMware Workstation


What is Fedora Project:-

The Fedora Project is a global partnership of free software community members. The Fedora Project is sponsored by Red Hat, which invests in our infrastructure and resources to encourage collaboration and incubate innovative new technologies. Some of these technologies may later be integrated into Red Hat products. They are developed in Fedora and produced under a free and open source license from inception, so other free software communities and projects are free to study, adopt, and modify them.

Fedora 17 Accepted Features

Setup a system to close duplicate crash reports being submitted by ABRT in Red Hat Bugzilla. Extend ABRT to find duplicate reports before filing a new bug.
Update Boost to the upstream (latest) 1.48 release.
A grab-bag of little cleanups and improvements all related to session and seat handling.
Cloudstack is an mature, enterprise-grade, fault tolerant, multi-hyerpvisor, production-ready IaaS platform.
ICC profile support for printing. Color management will be applied to printed jobs at the rasterization step. This can lead to improved color fidelity in printed output.
Darkserver is a service written to help people finding details of build-id(s). This service will be integrated with the Fedora infrastructure and includes a web interface and koji plugin.
Enhancements to NetworkManager will support enterprise features like bonding, IP-over-Infiniband, VLAN, and likely bridging.
An open source middleware for High Performance Computing implementing the Grid RPC model.
The DNS Root zone was signed in July 15, 2010 and there are more than 20 TLDs signed via DNSSEC. Fedora will bring benefit of this important feature to the end users and their workstations.
Support for ext4 filesystems larger than 16T (2^32 blocks).
An update of the GNOME desktop to the latest upstream release.
Enable use of kernel target (LIO) for iSCSI and FCoE.
Open source cloud IaaS for Fedora

Download Fedora Core 17 Beefy Miracle

Here I am going to cover steps to install Fedora 17 on VMware workstation 8, as you know Fedora 17 is in Alpha Stage. So its not fully supported by VMware Workstation.

I have get lots of error while installing Fedora 17 on VMware workstation. Sometimes my GUI works & some times it won't. Once I reboot my Fedora 17 VM forcefully to complete the Fedora 17 setup..

Still Graphical Interface of Fedora Core 17 is not working with VMware workstation, it might work with VMware workstation after releasing new Version or Patches.

[gallery link="file" columns="2"]


Block Google Chat in a Network


To block google chat in your office network you just need to block below two URL's on OpenDNS server,
talk.google.com
talkx.l.google.com
Check my below guide on OpenDNS configuration,

Block Websites Without Any Software or Proxy


OpenDNS Configuration Guide


Here I am going to show you how to block any website e.g Facebook, Google plus, Google chat, Email without any proxy server. You can block any website in your local area network using OpenDNS.  DNS is such an integral part of our Internet life working behind the scenes every time we connect to a website. Our Internet Service Provider specifies the DNS Server address that we put into the browser network settings or the router or DNS server.
Here we are going to change DNS server of our DNS Server or Cisco Router (which is gateway to your network) to OpenDNS servers. OpenDNS is very fast, There are no software to install, it’s very easy to set up and the price is just right - $0.

To use OpenDNS, all you have to do is open your Network Connections or Router’s settings page and update the default DNS server to point to the OpenDNS nameservers that are 208.67.222.222 and 208.67.220.220.

Another advantage of using OpenDNS is that it blocks phishing websites from loading on your computer. If you are a parent worried about kids visiting adult websites on the home computer, you can configure OpenDNS to block any adult website from loading on the computer. In fact, few business places use OpenDNS to block social sites like MySpace and Facebook on employee computers.

So let’s get started, follow below steps,

1.     1.   First register your OpenDNS account on https://store.opendns.com/get/free-dns-work


2.    2.   Fill the required info & create your OpenDNS account.

3.   3.    Login to your OpenDNS account & skip all other settings & go to OpenDNS dashboard.
4.      OpenDNS dashboard looks like as shown in below image.


5.      Navigate to Home & select Add Network Tab
6.      Add your network IP & click on Add This network tab. You can check your IP via www.whatismyip.com


7.      Now go to settings & select your Network IP


8.      Now configure the Web Content Filtering as per your requirement. In my case I choose custom configuration & blocked Social networking & proxy & Adult sites


9.      If you want to block individual domain you can do it using “Manage Individual Domain” option,
In my case I have blocked facebook.com & Google web based chat.  OpenDNS works very well. It generated very good stat report for you.


Now we have created OpenDNS account, now next step is to configure our DNS server/router or desktop machine.

OpenDNS Configuration for Windows 7/XP,

1.                   1.  Navigate to Start->Control Panel -> Select Network & Connection sharing
2.                              Go to properties of your active Local Area Connection

3.      Highlight the 'Internet Protocol Version 4' and click Properties.


4.      Click the radio button 'Use the following DNS server addresses:' and type in OpenDNS' addresses in the Preferred DNS server and Alternate DNS server fields.


5.      Click OK button

6.      Now flush the DNS resolver cache of the server and the DNS resolver caches and web browser caches of the users using the DNS server to apply DNS configuration settings immediately.

7.      Now try to access facebook.com which we blocked on OpenDNS. You will get error as shown in below image


OpenDNS Configuration for DNS Server,

I am using windows 2008 DNS server,

1.       I have windows 2008 DNS server
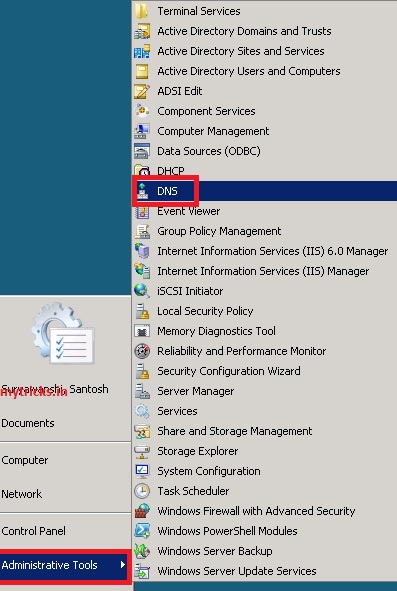
2.      Navigate to Start Menu->Administrative tools & select DNS

3.      Right on DNS Server & go to properties

4.      Now select forwards option & add open DNS Server. Please write down your current DNS settings before switching to OpenDNS, in case you want to return to your old settings for any reason.
The addresses for Open DNS are: 
208.67.222.222
208.67.220.220


5.       Click Ok.
6.      Now flush the DNS resolver cache of the server and the DNS resolver caches and web browser caches of the users using the DNS server to apply DNS configuration settings immediately.
7.      Now try to access facebook.com which we blocked on opendns. You will get error as shown in below image


OpenDNS Configuration for Cisco Router,
In my case I am using Cisco Router. In your case it could be the Linksys/Dlink wireless router. Configuration is straight forward just change your DNS server of your router to the OpenDNS server (i.e. 208.67.222.222 & 208.67.220.220)
1.       Login to your router
2.      Go to config level
# config t
R1(config)# ip name-server 208.67.222.222
R1(config)# ip name-server 208.67.220.220
R1(config)# exit
R1#wr
Save your router configuration

3.      Now try to access facebook.com which we blocked on opendns. You will get error as shown in below image.
4.      Now flush the DNS resolver cache of the server and the DNS resolver caches and web browser caches of the users using the DNS server to apply DNS configuration settings immediately.


OpenDNS Configuration Guide


Here I am going to show you how to block any website e.g Facebook, Google plus, Google chat, Email without any proxy server. You can block any website in your local area network using OpenDNS.  DNS is such an integral part of our Internet life working behind the scenes every time we connect to a website. Our Internet Service Provider specifies the DNS Server address that we put into the browser network settings or the router or DNS server.
Here we are going to change DNS server of our DNS Server or Cisco Router (which is gateway to your network) to OpenDNS servers. OpenDNS is very fast, There are no software to install, it’s very easy to set up and the price is just right - $0.

To use OpenDNS, all you have to do is open your Network Connections or Router’s settings page and update the default DNS server to point to the OpenDNS nameservers that are 208.67.222.222 and 208.67.220.220.

Another advantage of using OpenDNS is that it blocks phishing websites from loading on your computer. If you are a parent worried about kids visiting adult websites on the home computer, you can configure OpenDNS to block any adult website from loading on the computer. In fact, few business places use OpenDNS to block social sites like MySpace and Facebook on employee computers.

So let’s get started, follow below steps,

1.     1.   First register your OpenDNS account on https://store.opendns.com/get/free-dns-work


2.    2.   Fill the required info & create your OpenDNS account.

3.   3.    Login to your OpenDNS account & skip all other settings & go to OpenDNS dashboard.
4.      OpenDNS dashboard looks like as shown in below image.


5.      Navigate to Home & select Add Network Tab
6.      Add your network IP & click on Add This network tab. You can check your IP via www.whatismyip.com


7.      Now go to settings & select your Network IP


8.      Now configure the Web Content Filtering as per your requirement. In my case I choose custom configuration & blocked Social networking & proxy & Adult sites


9.      If you want to block individual domain you can do it using “Manage Individual Domain” option,
In my case I have blocked facebook.com & Google web based chat.  OpenDNS works very well. It generated very good stat report for you.


Now we have created OpenDNS account, now next step is to configure our DNS server/router or desktop machine.

OpenDNS Configuration for Windows 7/XP,

1.                   1.  Navigate to Start->Control Panel -> Select Network & Connection sharing
2.                              Go to properties of your active Local Area Connection

3.      Highlight the 'Internet Protocol Version 4' and click Properties.


4.      Click the radio button 'Use the following DNS server addresses:' and type in OpenDNS' addresses in the Preferred DNS server and Alternate DNS server fields.


5.      Click OK button

6.      Now flush the DNS resolver cache of the server and the DNS resolver caches and web browser caches of the users using the DNS server to apply DNS configuration settings immediately.

7.      Now try to access facebook.com which we blocked on OpenDNS. You will get error as shown in below image


OpenDNS Configuration for DNS Server,

I am using windows 2008 DNS server,

1.       I have windows 2008 DNS server
2.      Navigate to Start Menu->Administrative tools & select DNS

3.      Right on DNS Server & go to properties

4.      Now select forwards option & add open DNS Server. Please write down your current DNS settings before switching to OpenDNS, in case you want to return to your old settings for any reason.
The addresses for Open DNS are: 
208.67.222.222
208.67.220.220


5.       Click Ok.
6.      Now flush the DNS resolver cache of the server and the DNS resolver caches and web browser caches of the users using the DNS server to apply DNS configuration settings immediately.
7.      Now try to access facebook.com which we blocked on opendns. You will get error as shown in below image


OpenDNS Configuration for Cisco Router,
In my case I am using Cisco Router. In your case it could be the Linksys/Dlink wireless router. Configuration is straight forward just change your DNS server of your router to the OpenDNS server (i.e. 208.67.222.222 & 208.67.220.220)
1.       Login to your router
2.      Go to config level
# config t
R1(config)# ip name-server 208.67.222.222
R1(config)# ip name-server 208.67.220.220
R1(config)# exit
R1#wr
Save your router configuration

3.      Now try to access facebook.com which we blocked on opendns. You will get error as shown in below image.
4.      Now flush the DNS resolver cache of the server and the DNS resolver caches and web browser caches of the users using the DNS server to apply DNS configuration settings immediately.