[Guide] Installing Mac OS X Snow Leopard in VirtualBox 4.1.4 Windows 7
Note: We don’t encourage downloading Apple software via file-sharing / torrent sites and run it in an virtualized environment under Windows. This guide is for informational purposes only. If you like OS X Lion, Get a Mac. It's against the EULA for Mac OS X to run the OS in a virtual machine. The EULA for Mac OS X Server and Mac OS X Server/Client 10.7 allows you to run the OS in a virtual machine, but only inside OS X on an Apple hardware.
This method is completely for testing and learning purpose.
Recommended
[Guide] How to Install MAC OS X Snow Leopard in VMware Workstation 8
Today I am going to show how to install MAC OS X Snow Leopard 10.6.6 in VirtualBox 4.1.4 on Windows 7. I was able to run MAC OS X Snow Leopard 10.6.6 in VirtualBox 4.1.4 after several days of trial & error. Here I have covered all steps with screen shots to install MAC OS X Snow Leopard 10.6.6 in VirtualBox 4.1.4. So lets get started,
My Setup -
1. Dell Precision Laptop with 12 Gigs of Memory with Core 2 Extreme Processor
2. VirtualBox 4.1.4
3. Windows 7 64-Bit
So lets get started,
1. Download & Install VirtualBox 4.1.4 from Download VirtualBox 4.1.4 Latest Release
2. Get a original Snow Leopard retail DVD or ISO file from here
Now go to Virtual Machine settings & disable USB Controller as shown below. I faced booting issues if USB Controller is enabled.
Click Continue to Install MAC OS X,
Here you will not see any Virtual Hard Disk for installation purpose. So now Click on Utilities->Disk Utilities.
On Left hand side select your Virtual Hard Disk & right click on it click on Erase to format it. After formatting hard disk close the "Disk Utility"
Now you can see the newly erased hard disk. So select the disk where you want to install MAC OS X & Click Install,
Now installation has started, generally it takes around 15 to 20 Minutes.
Click on Restart to complete the MAC OS X installation,
This method is completely for testing and learning purpose.
Recommended
[Guide] How to Install MAC OS X Snow Leopard in VMware Workstation 8
Today I am going to show how to install MAC OS X Snow Leopard 10.6.6 in VirtualBox 4.1.4 on Windows 7. I was able to run MAC OS X Snow Leopard 10.6.6 in VirtualBox 4.1.4 after several days of trial & error. Here I have covered all steps with screen shots to install MAC OS X Snow Leopard 10.6.6 in VirtualBox 4.1.4. So lets get started,
My Setup -
1. Dell Precision Laptop with 12 Gigs of Memory with Core 2 Extreme Processor
2. VirtualBox 4.1.4
3. Windows 7 64-Bit
So lets get started,
1. Download & Install VirtualBox 4.1.4 from Download VirtualBox 4.1.4 Latest Release
2. Get a original Snow Leopard retail DVD or ISO file from here
3. Download EmpireEFIv1085.iso for Intel Processors or you can use Original Snow Leoprad DVD bootloader
So let's get started,
First create a Virtual Machine in VirtualBox,
Assign Name to Virtual Machine & Select Operating System & version as shown Below, Assign 2GB of Memory to MAC OS X Virtual machine & Click Next
Assign minimum of 20GB of Hard disk & create a VM.Now go to Virtual Machine settings & disable USB Controller as shown below. I faced booting issues if USB Controller is enabled.
Now turn on the MAC OS X Virtual machine. On boot screen press F8 & enter -v (i.e. verbose) option & press Enter. "-v" option is necessary if you want to see Boot error messages this will help you to solve errors while installing MAC OS X.
Use English for the Main Language & Click Next,Click Continue to Install MAC OS X,
Here you will not see any Virtual Hard Disk for installation purpose. So now Click on Utilities->Disk Utilities.
On Left hand side select your Virtual Hard Disk & right click on it click on Erase to format it. After formatting hard disk close the "Disk Utility"
Now you can see the newly erased hard disk. So select the disk where you want to install MAC OS X & Click Install,
Now installation has started, generally it takes around 15 to 20 Minutes.
Click on Restart to complete the MAC OS X installation,
As soon as installation finished and starts counting down to restart as shown above screen shot, press the Right-Ctrl and then click on Devices at the top and hit CD/DVD Devices and click Unmount CD/DVD Device forcefully. And Mount Downloaded EmpireEFIv1085.iso file.
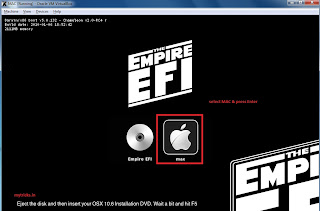
Now during MAC OS X booting you will see the EmpireEFIv boot-loader. Select MAC OS X & press Enter as shown below.
Here we go MAC is up & running.


